PAGE INDEX
ASUSTOR AS-604T NAS Server Setup
The first thing you need to do with most NAS devices is discover them on your network and set them up. Most NAS vendors bundle a small, lightweight “finder” application with their products that has some system utilities included. The ASUSTOR Control Center provides Device Discovery, Open, Connect, Configuration, and Startup/Shutdown functions, all before you log in to the full monitoring & control applications via the web browser. There are a number of sub-menus that you go through during initial setup; once you do that, the setup wizard is still available in case you get forget your password or need to reconfigure the NAS. Otherwise, just use your browser and login to the IP address that the NAS is configured to; the default is 169.254.1.2.

Once the initial setup is complete, you need to log in to the main admin application, which ASUSTOR calls the ASUSTOR Data Master (ADM) Operating System. The default main screen presents you with several large icons:
- Access Control
- Activity Monitor
- APP Central
- Backup & Restore
- External Devices
- File Explorer
- Services
- Settings
- Storage manager
- System Information
- Online Help
Each of these icons spawns a new window, much like any app would do. One improvement that ASUSTOR implemented in their software is multi-tasking. Most other NAS software only allows you access to one function at a time, usually through a hierarchical menu structure. ADM operates more like a modern GUI, where you can leave open or minimize a window that is running a specific task for you, and then open another one to start performing a different task. Windows that are minimized slide up to the top bar of the main window, just like the System Tray in Windows except it’s at the top of the screen.

One of the critical aspects of setting up a NAS is the networking configuration. It’s so easy to get it wrong and accidentally shut down access, that ASUSTOR includes tools in their setup wizard application, which you can still access after you inadvertently locked yourself out. If you get it completely out of whack, it’s still possible to recover by using the system reset button, which can be accessed through a small hole in the rear panel. Once you’re inside, this screen lets you change global settings and individual settings for each of the Ethernet ports available on the system. IPv4 and IPv6 are both accommodated and a default port can be selected. The two integral ports on the AS-640T are labeled “LAN1” and “LAN2”; and I’m happy to say that the ports on the back panel are physically labeled as well. That’s been a pet peeve of mine for a while, devices having two network ports and no identifying marks on the panel. On the ASUSTOR unit, even the LED indicators on the front panel are marked 1 & 2. Sometimes it’s the small things that matter….

A Link Aggregation pull-down menu allows the two ports to be linked together and configured for a variety of protocols: Round-Robin, Active-Backup, XOR, Broadcast, 802.3ad, Adaptive Transmit Load balancing, or Adaptive Load balancing. The two ports on the AS-604T are easily linked and unlinked, by using these tools. All testing in this review was done with single port connections, to keep the playing field level. I have had very mixed results so far using LACP on a variety of NAS products; it’s not a simple plug-and-play way to double your throughput, that’s for sure. I’ve had some excellent results with 10GbE connections, though.

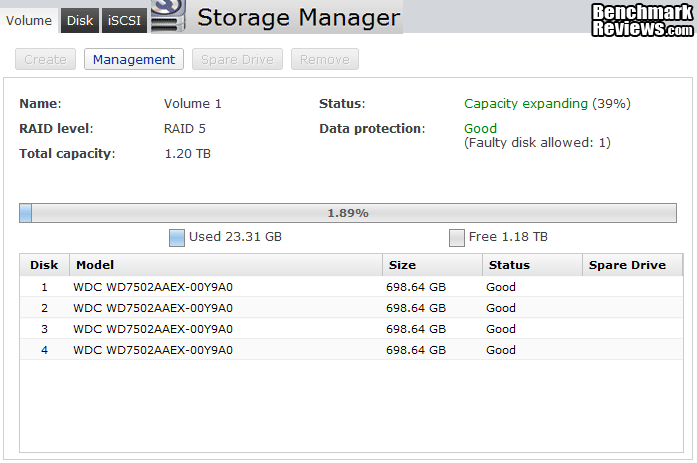
Let’s look at the RAID expansion and Migration process a little. The Storage Manager is the application you use to configure the disk volumes. Our testing protocol at Benchmark Reviews uses both single disk and RAID 5 storage configurations. Besides the raw test scores we get from those setups, it also allows us to go through the RAID Migration process to see how well that works. Plenty of people start small when they get a new NAS, and expand the capacity later. After I added the remaining three disks to the system, I was presented with the choice of RAID 1, 5, 6, or 10 and I chose RAID 5 from the pick list. The AS-604T performed this in two steps – first it created a RAID 1 volume and then it migrated that volume from RAID 1 to RAID 5. All together, the process took about 16 hours to ‘synchronize’ all the disks. I’ve definitely gotten spoiled by the systems I’ve tested recently, that used pools to manage disk configurations. On those systems, I was able to make this same transition in a few minutes. Starting from scratch with all four disks installed during the initial setup would have shaved quite a few hours off this procedure, I believe.

Ok, if you’ve been following along this far, there’s not much more I can show you except how fast it is. So let’s get down to some benchmarking, and compare it to a variety of other NAS products that we’ve looked at in the recent past.


Most Recent Comments