


PAGE INDEX
The Build Continued
Well, I guess I’ll have to stop being so stubborn and just continue on for now.

Next up: the PSU and some…additions. I had a 230mm BitFenix fan sitting around, so of course I needed to see what a fan almost the size of the chassis would look like installed in the Prodigy M. After installing the PSU, I realized the mesh in front of the power supply makes a great array of tie-down points. Even with a non-modular power supply it would be pretty easy to manage most of the extra cables; there’s enough room on either side of the power supply to stash cables. I initially was a little concerned about cables near the giant fan at the bottom that I added, but BitFenix engineered the case to leave nice channels alongside for routing – a comforting touch, as there are a lot of fan blades in close proximity here!

I ended up swapping the side panels, using the power button and USB 3.0 ports on the left side (behind the motherboard tray). This way, drives would be hard to reach but running the cables from this panel would be much easier (and wouldn’t need to be routed around that giant fan!) – even so, I’d recommend attaching all necessary cables to the motherboard first as squeezing my hand in between the GPU and radiator to attach the USB 3.0 cable to the header on the motherboard was impossible (your motherboard choice will determine if you run into the same issue).
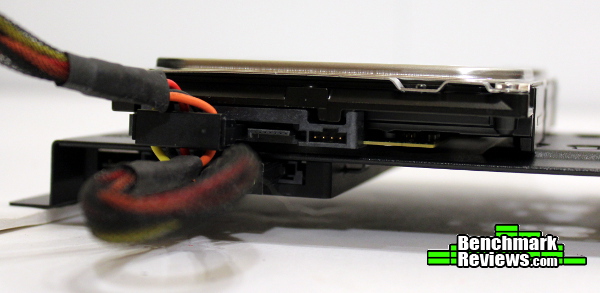
Remember the drive bracket? I’ve seen vertical mounts before, but the way BitFenix engineered this one is pretty slick. After attaching the rubber grommets to your 3.5″ drives, just slide them in the circular notches. 2.5″ drives are fastened by two screws and two hooks (except for the middle spot, which will just use four screws – if you plan to use this location, attach it before sliding on the bigger drives). They will sit opposite each other, making cabling surprisingly simple. In fact, you can even install the bracket and attach the cables later, as the data and power jacks are easily reached even when the drives are mounted. You did remember to attach SATA cables to your motherboard already, right? Again, depending on your motherboard, this might be simple or impossible to do at this point – so plan out your build or else you’ll find yourself removing a graphics card again (not that I know anyone to which this would happen – I am experienced).

With everything installed there are a few more observations to make. I had also replaced the rear fan with a 140mm Spectre Pro version from BitFenix – not a problem, but check out that clearance between the fan frame and the 3.5″ hard drive! Being this close won’t cause any performance issues, but it will limit your ability to install a 140mm AIO water cooler in this location (if you also want to install a hard drive there). That’s a trade-off that I feel is perfectly acceptable in a computer case this size.
Even with a modular PSU, cables can get a little messy – as I mentioned before most of them can be tied down to the front mesh, but there’s no avoiding a little clutter in a small case. Managing the cables is certainly doable though, and there’s enough room on either side of the power supply to tuck a lot of them out of the way.

With the vertical drive bracket installed a little channel is formed for cables beside the 230mm fan. Since the bracket is offset into the chassis a bit, it completely covers the cables and prevents them from slipping into the fan blades. With so many cables in such close proximity to fan blades, this is a really impressive design consideration. I was able to wire the system in such a way that I could pick up the Prodigy M and transport it around, then plug it in and power it up without fearing that cables had shifted and might get caught in something.
Most Recent Comments