PAGE INDEX
Corsair Spec-Omega Detailed Features
I’ll start this section off with the manual/guide, and warranty information. Corsair has each of the screws needed for building a system conveniently in separate baggies for ease of access.
I’m glad to see this more and more, as the days of digging through one bag with all the screws jumbled up is a waste of time and annoying. It may not be much, but when you don’t want to waste time looking for the right screw and just get on with your build, this can save you some time.

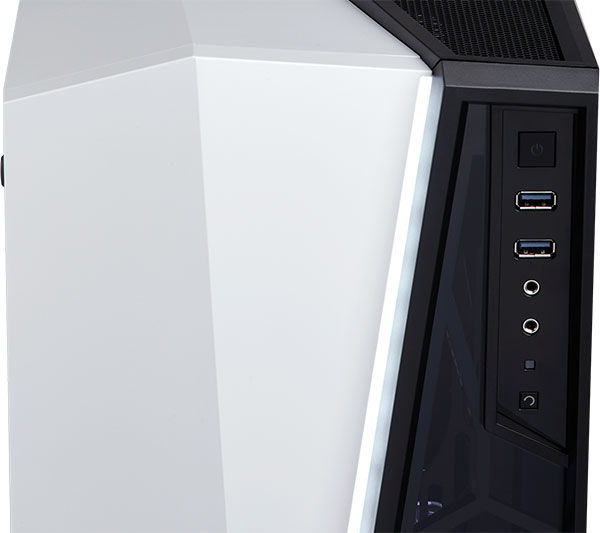
The front panel connectors terminate into a tidy area in the upper left corner of the case. You have a white illuminated power button, two USB 3.0 ports, headphone and mic jacks, HDD drive activity LED, and a reset button at the bottom.
The power button has a bit of a mushy feel, and isn’t ‘clicky’ like most other power switches, but does it’s job all the same.

Pre-installed at the front of the Spec-Omega we have one of the SP120mm fans. This one is a clear plastic, and has white LEDs included.

At the rear of the case is the other pre-installed SP120mm case fan. I would of prefered Corsair to include another white LED fan just for symmetries sake, even if that added another 5 dollars to the cost. It just feels out of place with the plain black fan and clear white LED fan in the same case.

Here is a shot of the only dust filter included with the Spec-Omega case. The PSU dust filter is akin to every other dust filter out there and should do it’s job well.

On the cable management side of the case we can see rubber grommet pass-through for power cables and front panel connectors. There is plenty of tie-down points along the back of the chassis, which will help organize the inevitable mess of wires needed to get a system up and running.
The Corsiar Spec-Omega comes with an SSD drive caddy installed here as well. You can fit up to three 2.5″ SSD drives here. It is also removable via two thumbs screws. For the system build I removed this drive caddy to allow more room for cable management.
You might notice a generous CPU cut-out that should make changing CPU cooler mounting brackets a breeze while the motherboard is installed.

Here is a look at all the connectors that are included with the Corsair Spec-Omega. There is the usual power, reset, power LED, and HDD LED front panel connectors, as well as front panel HD audio, USB 3.0, and a SATA power cable for the front panel LED.

Now we have a look at this front panel. Aesthetically, I find this piece to be good looking. Functionally, I find it very flawed. At the bottom we have a connector to power the LED strip that is concealed in the plastic. This makes removal and installation a bit tedious as you have to unplug/plug it every time you have to remove the panel for any reason.
Also, the glass part of the panel, while nice looking, only impairs performance for any installed front case fans, or radiators. I think Corsair should of gone with the same black grill at the bottom of the case in place of the glass, as it is on the Spec-Alpha case. It does appear that you can remove this glass by removing several screws. This would improve airflow to fans immensely, but without any filter, this could lead to a great deal more dust and larger particles getting into your fans and case interior.
Lastly, this front panel was one of the more painful to remove. It’s just held on with plastic tabs, but the tabs are a bit more flimsy and I almost broke one by removing it to install the radiator into the case. And I’m generally very careful with these pieces, I don’t just yank and pray! I take the time to see exactly how it’s connected to the front of the chassis, so when I still had issues removing this, it became quite frustrating.

Next page I’ll go over the a system build with the Spec-Omega case and detail my experience and discoveries along the way.


Most Recent Comments